Wednesday, October 26, 2022

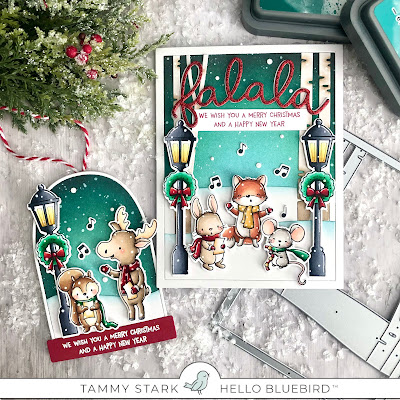
Merry Carolers with Hello Bluebird

Hello friends! Today I'm over on the Hello Bluebird blog sharing this card and coordinating tag, featuring Merry Carolers from the brand new Holiday release!

All the details are over on the HB blog, but I am listing the Copic colors here for you!

Copic Colors:

Squirrel: E25, E23, E31, E50, E0000
Moose: E44, E43, E42, E41, E0000, E53, E51, E50
Bunny: E44, E43, E42, E41, E0000, R20, R000
Fox: E99, E97, E11, E21, E0000, W3, W1, W00
Mouse: W5, W3, W1, W00, R20, R000
Red: E59, E46, E27, E35
Green: G28, G17, G13, G03, G00
Yellow/Gold: Y26, Y23, Y21, Y000
Black: C7, C5, C3, C1

Thanks for stopping by! 

Hugs,
Tammy


Monday, October 24, 2022

Holiday Envelopes with Pretty Pink Posh

Hello friends! Tammy here with a sneak peek of the new Holiday Envelopes Stamp Set. This adorable set features two different envelope images, along with some fun sentiments and coordinating dies.


To begin, I stamped out the snowflake envelope, colored with Copic markers, and die cut it with the Holiday Envelopes Coordinating Dies. I added some fine white glitter to the snowflakes to add a touch of shimmer. Next, I stamped the penguins from Penguin Pals, coloring them with Copic markers before die cutting with the Penguin Pal Coordinating Dies.

Next, I ink blended a die cut rectangle with Broken China and Tumbled Glass Distress Oxide inks. I placed the new Layered Snowflake Stencils  over the inked background and lightly inked some white pigment ink to create the subtle snowflake background. I then splattered some white acrylic paint (thinned with water) onto the stenciled background to add interest.


Next, I attached the inked rectangle onto striped patterned paper. I adhered the snowflake envelope image onto the background, then stacked the penguins on top of each other, attaching with foam tape for dimension. The sentiment was white heat embossed onto red cardstock sentiment strip, die cut from the Holiday Envelopes Coordinating Dies and attached with foam tape. Lastly, I added some white  snowflake embellishments from the new Winter Snowflake Clay Confetti to add a finishing touch!

I hope you enjoyed today's sneak peek! Thanks for stopping by!

Hugs,
Tammy


Sunday, October 23, 2022

Hello Bluebird - Holiday Release Day!

Hello friends! Today is the day! The Hello Bluebird Holiday Release goes live TONIGHT at 7PM MST!

My card today features the new 'Dear Santa' stamp set and 'Special Delivery Words Die'. Seriously, the cutest!!


Using the Snowy Sky Scene Die, I die cut the snowy hills from white cardstock and the top from pink cardstock, layering it over white cardstock cut to A2 size. I lightly inked the snowy hills with Tumbled Glass Distress Oxide ink, then attached the frame using foam tape. I added some white die cut trees and the little house from the new 'Snowy Countryside Square Scene Die'.

Next, I stamped the images from Dear Santa and colored them using the following Copic colors:

Mouse - W5, W3, W1, W00, R20, R000
Cat - C5, C3, C1, C0, C00
Dog - E25, E23, E31, W3, W00
Bird - E44, E43, E42, E41
Mailbox - C7, C5, C3, C1, E44, E43, E42, E41
Red - R59, R46, R35
Green - G46, G43, G40
Envelopes - R20, R01, R000/ E50, E0000, C3, C1, C00
Snow - BG10, BG000

Be sure to visit the Hello Bluebird blog to see the gorgeous samples from the design team and the other products being revealed today, and leave a comment for a chance to win a $50 gift certificate to the store! The chance to comment ends today at 4PM MST today and the winners are being announced at 5PM PST on the HB blog before the release goes live at 7PM MST.

Thanks so much for stopping by and happy shopping!!

Hugs,
Tammy

Saturday, October 22, 2022

Hello Bluebird - Preview Day 2 - Holiday Release

Hi friends and welcome to Day 2 of Previews for the Hello Bluebird Holiday Release, which will be available for purchase tomorrow, October 23rd at 7PM MST!

Today I am showcasing the adorable new 'Penguins on Ice' stamp set and the new 'Ice Skating Pond Horizontal Scene Die'. I absolutely adore these penguins and their sweet faces and had so much fun creating this icy wonderland!!

To begin, I die cut Bristol smooth cardstock using the new Ice Skating Pond Horizontal Scene Die. I ink blended the background with Pine Needles and Evergreen Bough Distress Oxide inks. The snowy hills were lightly inked with Evergreen Bough and Tumbled Glass, and the birch trees were inked with Tea Dye ink, then I dabbed on some Snow Tex to add snowy texture to the trees, then sprinkled some glitter onto it before it dried.

I then stamped the images from Penguins on Ice and colored them with the following Copic colors:

Black - C7, C5, C3
White - C3, C1, C00
Red - E89, E46, E27, E35
Mint - G02, G00, G000


I arranged the penguins onto my card, attaching with foam tape for dimension. I added some white snowflakes die cut using the Frosty Flakes Die, then white heat embossed the sentiment onto a charcoal gray sentiment strip to complete my card!

Be sure to visit the Hello Bluebird blog to see the gorgeous samples from the design team and the other products being revealed today, and leave a comment for a chance to win a $50 gift certificate to the store! 

Thanks for stopping by and I'll see you tomorrow for Release Day!

Hugs,
Tammy
 

Friday, October 21, 2022

Hello Bluebird Stamps - Preview Day1 - Holiday Release

Hello and welcome to Preview Day 1 of the Holiday release from Hello Bluebird Stamps. The release will be available for purchase on Sunday October 23rd at 7PM MST.

Today I am showcasing the adorable new 'Friendsgiving' stamp set and the new 'Winter Birch Scene Die'. How sweet are these adorable images? The fox carrying the turkey is my favorite, lol!


I began by die cutting Bistol smooth cardstock using the new Winter Birch Scene Die. I ink blended the sky using Speckled Egg Distress Oxide ink and the grassy hills with Shabby Shutters and Crushed Olive D.O. I lightly inked the edges of the birch trees with Antique Linen before piecing it all together.
Next, I stamped the images from Friendsgiving and colored the images with the following Copic colors:

Bear - E44, E43, E42, E41, E0000/ Pie - (tin)C5, C3, C1 (pie) E25, E23, E31, E50
Squirrel -  E25, E23, E31, E50, E0000/ Acorn - (top) E47, E44 (bottom) E43, E42, E41
Raccoon - W9, W7, W5, W3, W1, W00/ Hat - C7, C5, C3, E25, E23, E31, Y23
Fox - E99, E97, E11, E21, E0000
Turkey - E43, E42, E41, E40, YR14, R35
Oranges - YR18, YR07, YR15, YR12, YR31
Greens - YG99, YG97, YG93, Y23, Y21

I then cut the colored images using the Friendsgiving Coordinating Dies and attached them to the die cut scene using foam tape. The sentiment was stamped onto a white cardstock strip with chocolate brown ink and attached with foam tape to complete my card!

Be sure to visit the Hello Bluebird blog to see the gorgeous samples from the design team and the other products being revealed today, and leave a comment for a chance to win a $50 gift certificate to the store! 

Thanks for stopping by and I'll see you tomorrow for Day 2 of Previews!

Hugs,
Tammy
Monday, October 17, 2022

Pretty Pink Posh - October Release Blog Hop

Hello friends! I'm so excited to be joining in on the blog hop to celebrate the Pretty Pink Posh October Release!  The brand new release is available now, and it's full of gorgeous holiday products!!  Be sure to read to the bottom of my post for info on the giveaway and links to today's blog hop participants!


For my blog hop project I created a fun set of tags, combining some brand new products with older products, the perfect touch for your holiday packages!


To create the tags, I began by stamping four wreaths from the Pine Wreath stamp set using a pine green ink. I stamped the wreath accessories with black Copic compatible ink and colored them with Copic markers. I then cut all the images with the Pine Wreath Coordinating Dies. I then cut four wreaths from heavy white cardstock and attached them to the back of the stamped wreaths to give my tags extra stability.


Next, I stamped out the adorable images from the Holiday Signs stamp set, colored with Copic markrs, and die cut with the Holiday Signs coordinating dies. I then attached the Holiday Signs images to the bottom center of each pine wreath using foam tape, then "decorated" the wreaths with the cute ornaments and bows.


To complete the tags, I punched a small hole at the top of the wreath and threaded some red and white bakers twine for the perfect touch!

GIVEAWAY

There are 3 $30 gift certificates up for grabs (one winner each day). Winners will be picked randomly along the blog hop. Comments must be left by 11:59 PM PST on 10/24/2022. Winners will be announced on the PPP blog.

Here's a list of all the designer's participating in today's blog hop:

Tammy Stark ---->YOU ARE HERE!!

Thanks so much for stopping by! Happy hopping!!

Hugs,
Tammy

Puddle Jumpers with Sunny Studio

Hello friends! I'm over on the Sunny Studio blog   with a Spring inspired box card, featuring the adorable set, Puddle Jumpers. All the ...