Tuesday, March 30, 2021

Birch Trees Background with Hello Bluebird

Hi friends! Today, I'm over on the Hello Bluebird blog  sharing this fun birthday card, featuring the Birch Trees Background Stamp from the brand new March release!


Head on over to the HB blog for all the details and products used to create this card!

Thanks for stopping by! Have a fantastic day!

Hugs,

Tammy


Monday, March 22, 2021

Easter Theme Week with Pretty Pink Posh


Hi friends! I'm so excited to be kicking off  Easter Theme Week with Pretty Pink Posh! I'm sharing a slimline card, combining older sets with some new items, to create this fun Easter scene!

** All items in the Easter Section are 15% off during theme week!!


To begin, I stamped, colored with Copic markers, and die cut images from the following sets:


Next, I cut a piece of Bristol smooth cardstock using the Slimline: Peekaboo Windows Dies. I ink blended the background with Peacock Feathers and Tumbled Glass Distress Oxide inks, adding some splatters for interest. I then cut the grassy borders using the Nature Essentials Dies, ink blended with Twisted Citron and Mowed Lawn inks and pieced them together to span across the length of my card. 
I arranged the sweet images onto my card, adding foam squares on some for dimension. 


Lastly, I die cut pink cardstock 3 times using the Fancy Easter Script Dies, stacked together, and attached across my card. I then attached my card front to a white 3 1/2 X 8 1/2" card base to complete my card.

Thanks so much for stopping by! I hope you are inspired to create some fun Easter, or Spring cards! See you tomorrow for Day 2 of Easter Theme Week!

Hugs,

Tammy

Friday, March 19, 2021

Feeling Froggy with Sunny Studio

Hello friends! I'm over on the Sunny Studio blog sharing a fun birthday card, featuring the adorable set, Feeling Froggy


To begin, I cut a white A2 rectangle and another using the green dot paper from Polka Dot Parade 6X6 Paper. I then cut the polka dot paper using the Fishtail Banner II Dies and attached to the white card base. 

Next, I stamped, colored with Copic markers, and die cut images from the following sets:


Copic Colors Used:

  • Greens: YG67, YG17, YG13, YG03, YG01, YG00
  • Browns: E44, E43, E42, E41
  • Hat: R22, R20, R000, Y18, Y13, Y11


Next, I cut a white scalloped circle using the Scalloped Circle Mat 2 Dies and layered a Stitched Circle, ink blended with Abandoned Coral, Dried Marigold, and Squeezed Lemonade Distress Oxide inks. I cut another circle then used the Slimline Nature Borders Dies to cut a curved edge for the water, and ink blended it with Tumbled Glass and Salty Ocean. Next, I arranged the images onto my card, using foam tape on some for dimension. 


Lastly, I cut a black cardstock banner using the Slimline Pennant Dies, and white heat embossed the sentiment from Froggy Friends to complete my card. 

Thanks so much for stopping by today!

Hugs,

Tammy


Friday, March 12, 2021

1 Stamp, 3 Ways - Eggstra Amazing Easter

Happy Friday, friends! Today, I'm over on the Lawn Fawn blog with another 1 Stamp, 3 Ways feature! This month, we are showcasing the sweet set, Eggstra Amazing Easter. Join us over on the blog for all the details and a complete product list.


Thanks so much for stopping by! As usual, I would love to hear your suggestions for sets or themes you would like to see featured in the upcoming months. Please leave a comment here or on the LF blog!

Have a wonderful weekend!

Big hugs,

Tammy

Wednesday, March 10, 2021

Pretty Pink Posh New Release - Spring Eggs

Hi friends! Tammy here today sharing a sneak peek of some of the adorable new products coming to Pretty Pink Posh on March 8th!


For my project, I created a card and matching gift tags, featuring the brand new set, Spring Eggs, such a wonderful set filled with beautifully designed eggs! I combined my project with the Easter Bunnies Stamp Set, since they pair so perfectly together!


To create the slimline card, I cut a piece of Bristol smooth cardstock using the largest die from the Slimline: Peekaboo Windows Dies. I ink blended the background with Spun Sugar and Kitsch Flamingo Distress Oxide inks, then I splattered on some watered down Picked Raspberry with a paintbrush to create some interest. Next, I added a 1 inch strip of cardstock, ink blended with Twisted Citron and Mowed Lawn to create a grassy border. I then added a white scalloped border using the Slimline: Scallop Frames Dies.

I stamped, colored with Copic markers, and die cut images from the following sets:


I arranged the images onto my card, using foam tape on some for dimension. Lastly, I stamped the sentiment in black ink to complete my card.


I created some gift tags to coordinate with my card. I absolutely love making handmade gift tags; it adds such a special touch to any gift! To create my tags, I began by cutting two tags from Bristol smooth cardstock using the Scallop Square Tags Dies. I taped off the edges of the tag with washi tape and ink blended the backgrounds with Spun Sugar and Kitsch Flamingo, and Tumbled Glass and Broken China Distress Oxide inks. Next, I added a grassy border cut from the Nature Essential Dies, and ink blended it with Twisted Citron and Mowed Lawn DO inks. I arranged the colored images from Spring Eggs and Easter Bunnies onto the tags and stamped the sentiment in black ink. I punched a small hole in the tags and added some green bakers twine to finish up my project.

Thanks so much for stopping by! 


Monday, March 8, 2021

Pretty Pink Posh March 2021 Blog Hop


Hi friends! Welcome to Day 1 of the blog hop to kick off the brand new March release, available NOW at Pretty Pink Posh! This amazing release is full of Spring and Easter products that are sure to inspire you!

 At the end of the post, I will list all of today's participants if you would like to start at the beginning.

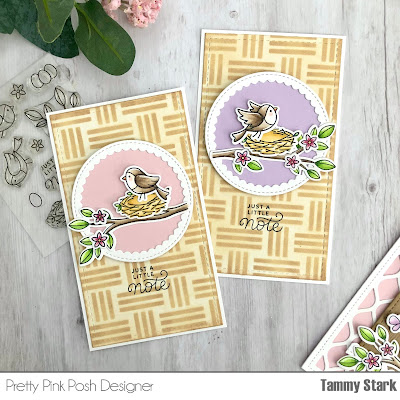
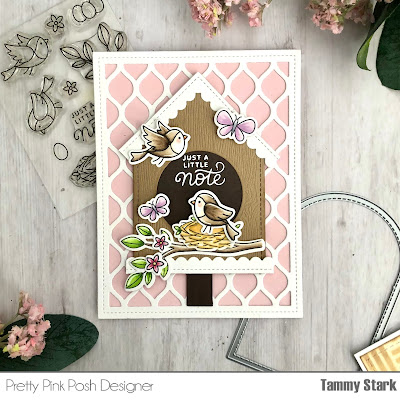
My projects are featuring the sweet new set, Spring Robins, along with some new stencils and dies. I created a fun and SIMPLE custom birdhouse for these spring cuties, with just a few dies, that I will show you how to make.


To begin, I stamped the images from Spring Robins, colored with Copic markers, and die cut with the Spring Robins Coordinating Dies.


My first project is a set of mini slimline cards, which measure approximately 3 1/2 X 6". I began by 
cutting Bristol cardstock with the largest rectangle from the Slimline Peekaboo Windows Dies. I placed the die over it again, adjusting the length to 6 inches, and ran it through my machine. Next, I inked the background with Antique Linen and Vintage Photo Distress Oxide inks using the Basketweave Stencil. I cut white mats, just slightly larger than 3 1/2" and layered my stenciled backgrounds onto them, then attached to a card base. I cut white Scallop Circles Dies and layered them over a light pink and lavender circle to create a soft, Springy backdrop for the robins. I attached the circle to the cards, then added the colored images with foam tape for dimension. Lastly, I stamped the sentiment in black ink to complete my mini cards.


My next project features a custom birdhouse, a home just perfect for these sweet birds! To begin, I cut an A2 piece of white cardstock using the Pretty Petals Background Die, removed the interior pieces, and layered on top of an A2 piece of light pink cardstock.

To begin, I stamped the images from Spring Robins and Mom, colored with Copic markers, and die cut with the Spring Robins Coordinating Dies and Mom Coordinating Dies.

Next, I created the birdhouse:


First, I cut a piece of woodgrain paper using the Stitched Duo 3 Dies to create the base of the birdhouse. I then cut a white rectangle frame using the Scallop Frames Dies, which will be cut apart to create a scalloped roof and base for the birdhouse.


I cut the frame in half, lengthwise, then placed it on the top of the tag (as shown in pic), trimming the length of the roof to look proportional. I then trimmed along the edges of the roof, cutting away the woodgrain paper. Using the leftover piece of the scalloped frame, I cut it to fit along the bottom of the birdhouse.


Next, I created a window in the birdhouse using the circle die from the Valentine Circle Coordinating Dies, and the Simple Strips Dies were used to create the post for the birdhouse.


I white heat embossed the sentiment onto dark brown cardstock, then adhered it to the back to complete the birdhouse.

Lastly, I trimmed down the Simple Strip and adhered to the card, attached the birdhouse using foam tape for dimension, and arranged the stamped images onto my card to finish! 

GIVEAWAY

There are 3 $25 gift certificates up for grabs (one winner each day). Winners will be picked randomly along the blog hop. Comments must be left by 11:59 PM PST on 3/16/2021. Winners will be announced on the PPP blog.

 Here's a list of all the designer's participating in today's blog hop:

Tammy Stark <<<<<You are here

Thank so much for stopping by! Happy Hopping!!

Hugs,
Tammy


Friday, March 5, 2021

Scalloped Circle Mat Dies with Sunny Studio

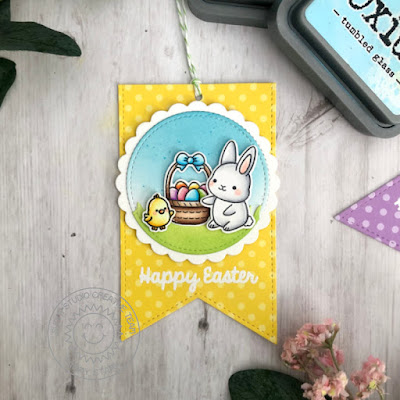
Hi friends! I'm over on the Sunny Studio blog sharing this fun set of Easter tags using the Scalloped Circle Mat 1 Dies. I love the versatility of these dies and the layering possibilities are endless!


To begin, I used the Slimline Pennant Dies and cut 3 tag bases from the Dots & Stripes Pastels Paper. Next, I die cut 3 white scalloped mats using the Scalloped Circle Mat 1 Dies, then layered a stitched circle using the Stitched Circle Large Dies. I ink blended the stitched circle with Broken China and Tumbled Glass Distress Oxide inks and attached them to the white scalloped mats. I added a grassy border to each tag by first die cutting a Stitched Circle, then cutting it with the Slimline Nature Border Dies, and ink blending with green inks.

Next, I stamped, colored with Copic markers, and die cut images from the following sets:

A Good Egg (sentiment)


Next, I white heat embossed the sentiment from A Good Egg onto the pennant tags. I attached the white scalloped circles to the tags using foam tape for dimension, then added the stamped images to create a little scene on each tag. Lastly, I punched a hole and added some green bakers twine to complete my tags. Now, I just need to tie them onto a bag of candy for a sweet Easter treat!


Thanks so much for stopping by! Have a fantastic day!

Hugs,
Tammy


Puddle Jumpers with Sunny Studio

Hello friends! I'm over on the Sunny Studio blog   with a Spring inspired box card, featuring the adorable set, Puddle Jumpers. All the ...