Monday, June 29, 2020

Monkey Friends with Pretty Pink Posh

Hi friends! Today, I'm over on the Pretty Pink Posh blog with another fun card from the brand new release. My card today features Monkey Friends and a few elements from Jungle Friends.


To begin, I cut a piece of cardstock to 3 1/4 X 8 1/4", and ink blended the background with Twisted Citron, Peeled Paint, and Forest Moss Distress Oxide inks. I added water splatters and some Forest Moss ink (thinned with water) to my inked background to add some interest.


I stamped the darling monkeys from Monkey Friends and the vines and leaves from Jungle Friends, colored with Copic markers, and cut out with the Monkey Friends Coordinating Dies and Jungle Friends Coordinating Dies.

Copic colors used:
Monkey: E37, E35, E33, E31, E30, E53, E51, E50, R30
Vines/Leaves: YG17, YG25, YG03, YG01
Bananas: Y15, Y11, Y00, E44, E43


Next, I added the vines and leaves to the inked background and attached the monkeys using foam tape for dimension. I then attached my card front to a 3 1/2 X 8 1/2" white card base. The sentiment, from the Hedgehog Friends Stamp Set, was stamped onto a black cardstock strip and embossed with white embossing powder.


To complete my card, I added some Lemon Drop Jewels...they add the perfect amount of sparkle and interest to any project!

Thanks so much for joining me today!!

Tammy


Wednesday, June 24, 2020

Stitched Arch Dies with Sunny Studio

Hi crafty friends! I'm over on the Sunny Studio Stamps blog sharing this fun summer themed card, featuring the new Stitched Arch Dies. I paired this awesomely versatile die with the darling seals from Sealiously Sweet to create a bright and happy summer card.


To begin, I cut the beach ball and ocean wave papers from the Summer Splash Paper to 4 1/4 X 5 1/2". Using the largest die from the Stitched Arch Dies, I cut a window from the beach ball paper. Then, I cut a sandy hill using the Stitched Semi-Circle Dies. I attached the sand to the ocean waves patterned paper background and adhered the window panel over the background with foam tape.

Next, I stamped the adorable images from Sealiously Sweet  and Tropical Scenes (palm trees) with Memento Tuxedo Black Ink, colored with Copic markers, and cut out with the Sealiously Sweet Dies and Tropical Scenes Dies.

Copic Colors Used:
Seals: C00, C0, C1, C3, C5, R30
Orange: YR04, YR14, YR12
Yellow: Y15, Y11, Y00
Blue: B05, B02, B00
Greens: YG01, YG03, YG25
Palm trees: YG17, YG25, YG03, YG01, E30, E31, E34, E35


I arranged the colored images to my card, attaching with foam tape for dimension. Next, I stamped my sentiment on a white banner strip and adhered it to the bottom of the arch opening.  I then  attached the card front to a white A2 card base to complete my card.

Thanks so much for stopping by!! Hope you all have a sealiously amazing day!! :)

XO,
Tammy


Tuesday, June 23, 2020

Rawr...You're Dino-mite!

Hi friends! Today, I'm over on the Butterfly Reflections Ink blog, sharing this fun, Dino-mite card using the June BRI Mood board. Head on over to the blog to get all the details and a complete supply list!


Thanks so much for stopping by...see you next time!

XO,
Tammy


Monday, June 22, 2020

Jungle Friends with Pretty Pink Posh

Hi friends! I'm so excited to be over on the PPP blog today! I am absolutely in LOVE with Pretty Pink Posh's brand new release...it's full of the sweetest little jungle animals I've ever seen! Today, I'm sharing a card I made featuring the cuties from Jungle Friends.


The background was created using the Jungle Background Stencil, and ink blending with Twisted Citron and Mowed Lawn Distress Oxide inks. I then splattered the background with some Mowed Lawn ink, thinned with water, for interest. I die cut the grass and frame (three times) using the Nature Essentials Die, and attached them to the inked background.


Next, I stamped the images from Jungle Friends, colored with Copic markers, and cut out with the Jungle Friends Coordinating Dies.

Copic colors used: 
Monkey: E37, E35, E33, E31, E30, E53, E51, E50, R30
Zebra: W1, W00, N6, N4, N2, N0, R30
Tiger: YR18, YR14, YR12, YR00, E53, E51, E50, R30
Lion: YR27, YR24, YR21, E53, E51, E50, R30
Leaves/Vines: YG17, YG03, YG01, YG25


I arranged the stamped images onto my card, using foam tape on the monkey for dimension. To complete my card, I stamped the sentiment from Jungle Friends in black ink, and attached my card front to an A2 white card base.

Thanks so much for joining me today!!

Tammy


Friday, June 19, 2020

Pretty Pink Posh June 2020 Blog Hop


Hi  friends and welcome to my blog! I'm so excited to be joining this blog hop to celebrate the Pretty Pink Posh June release! It is full of so much jungle cuteness, I can hardly stand it!!

If you're following along on the blog hop, you should have arrived here from my super talented friend, Suzy Plantamura At the end of the post, I will list all of today's participants if you would like to start at the beginning.

My card today showcases the darling new set Monkey Friends and some elements from the Nature Essential Die.


I began with a 3/14 X 8 1/4" piece of Bristol smooth cardstock and ink blended with Picked Raspberry, Dried Marigold, and Scattered Straw Distress Oxide inks.

Next, using the Nature Essential Dies, I cut 2 of the scalloped borders from Bristol cardstock and ink blended with Twisted Citron and Mowed Lawn inks. I attached them to the top of my inked panel to create a lush canopy. I cut 3 tree branches from brown cardstock and tucked them underneath my canopy and cut off the excess from the bottom.


Next, I stamped some images from the brand new sets, Monkey Friends and Jungle Friends, colored with Copic markers, and die cut with the Monkey Friends Coordinating Dies and the Jungle Friends Coordinating Dies.

Copic Colors used:
Monkey: E37, E35, E33, E31, E30 (body) E53, E51, E50 (face/belly) R30, 
Vines/Leaves: YG17, YG03, YG01, YG67, YG63, YG61
Flowers: RV10, RV13, Y32
Bananas: Y15, Y11, Y00, E44, E43


I arranged the vines, leaves, and flowers onto my card and added the monkey's using some foam tape for dimension.To complete my card, I stamped the sentiment from Monkey Friends with black ink and attached the panel to a 3 1/2 X 8 1/2" white card base.

Giveaway

There are 4 $25 gift certificates up for grabs (two winners each day)! For a chance to win, follow along the blog hop and leave a comment by 11:59 PM PST on 6/24/2020. Winners will be chosen randomly along the blog hop and announced on the PPP blog!

Thanks so much for stopping by...your next stop is Yana Smakula.

Here's the complete list of blog hop participants for today:

Pretty Pink Posh
Kay Miller
Debbie Olson
Caly Person
Sharna Waksmulski
Melody Rupple
Jeanne Jachna
Dana Kirby
Suzy Plantamura
Tammy Stark >>>You are here >>>
Yana Smakula

Have a great day, my friends...Happy Hopping!!

XO,
Tammy

Wednesday, June 17, 2020

Summer Sweets with Sunny Studio

Hi there! Today, I'm over on the SSS blog sharing this sweet card, featuring Summer Sweets. I am not a sweet eater (give me ALLL the savory), but I will be reaching for this set quite often, as I have a house full of people with a major sweet tooth!


To begin, I cut an A2 rectangle, using the Dots & Stripes Pastels Paper. Next, I cut a 2 1/2" strip of Bristol smooth cardstock and lightly ink blended the background with Peacock Feathers Distress Oxide ink. I added some water splatters and watered down Peacock Feathers ink with a fine paintbrush to add some interest. Using the Stitched Scallop Dies, I cut 2 white borders, attached them behind my inked panel on the top and bottom, and attached it to the center of the polka dot paper.

Next, I stamped the images from Summer Sweets using Memento Tuxedo Black Ink, colored with Copic markers, and cut out with the coordinating Summer Sweets Dies.


Copic Colors used:
Aqua: BG10, BG11, BG13
Pink: R81, R83, R85
Red: R22, R24, R29
Browns: E30, E31, E34, E59, E57, E55
Cream: YR30

I stamped the sentiment from Summer Sweets in black ink, then arranged the colored images onto my card, attaching with foam tape for dimension. To finish my card, I attached my card front to an A2 white card base.

Thanks so much for stopping by today! have a wonderful day!!

XO,
Tammy


Friday, June 12, 2020

Dad + Me - 1 Stamp, 3 Ways with Lawn Fawn

Hi crafty friends! I'm so excited for our monthly Lawn Fawn feature - 1 Stamp, 3 Ways. This month I am showcasing Dad + Me, featuring a handmade camper made exclusively from Lawn fawn dies. Head on over to the Lawn Fawn Blog for all the details.


Thanks so much for stopping by...I hope you guys are loving this new feature!  Be on the lookout for another poll in Instagram stories to vote on next month's featured stamp set!

Have a great day!

XO,
Tammy

Wednesday, June 10, 2020

Sea You Soon with Sunny Studios

Hi friends! Today, I'm sharing a card featuring Sea You Soon  from Sunny Studio Stamps newest release. I combined it with the Tropical Scenes and Best Fishes to create a fun underwater scene.
I absolutely love this little set; its the perfect addition to complete your ocean or underwater themed cards!


To begin, I cut a piece of Bristol smooth cardstock to 3 1/4 X 8 1/4", and ink blended it with Cracked Pistachio and Peacock Feathers Distress Oxide Inks. I splattered some water onto my background and blotted it up, then I added some watered down Peacock Feathers ink onto my background with a paintbrush. Once dry, I attached my panel to a 3 1/2 X 8 1/2" white card base.

Next, I stamped, colored with Copic markers, and cut out the images with the following sets:

Sea You Soon (shark on top, octopus, small fish)/ Coordinating Dies
Best Fishes (crab, starfish, clown fish, hammerhead, shark, sentiment)/ Coordinating Dies


I arranged the images onto my card, attaching some with foam tape for dimension. To finish my card, I stamped the sentiment from Best Fishes onto black cardstock with embossing ink and heat embossed with white embossing powder.

Thanks so much for stopping by! Sea you soon, lol!

XO,
Tammy


Thursday, June 4, 2020

Cruisin' Cuisine with Sunny Studio

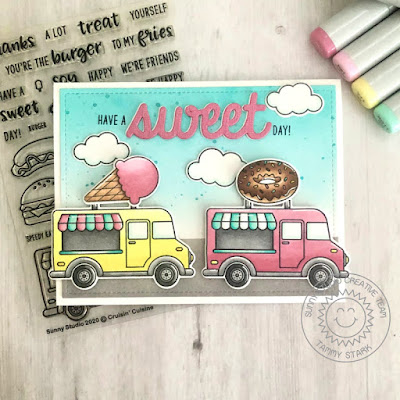
Hi friends! Today, I'm over on the Sunny Studio blog with this super fun card featuring Cruisin' Cuisine. I love that you can create so many darling food trucks...perfect for the foodie in your life.


To begin, I cut a stitched rectangle from Bristol cardstock and ink blended the top with Peacock Feathers and Tumbled Glass Distress Oxide ink. I then masked off the bottom of the card and blended with Smokey Shadow and Black Soot to create a street for my food trucks. Once dry, I attached to my card base.

Next, I stamped my images from Cruisin' Cuisine and Plane Awesome (clouds) onto Bristol cardstock with Memento Tuxedo Black Ink. All images were colored with Copic markers, highlighted with a white gel pen, and cut out using the coordinating Cruisin' Cuisine Dies and Plane Awesome Dies.


I arranged the stamped images onto my card and attached the food trucks with foam tape for dimension. Next, I die cut a title from pink cardstock with the Sweet Word Die three times and attached it to the center of my card. I stamped the rest of the sentiment from the Cruisin' Cuisine Stamp in black ink to complete my card.

Thanks so much for stopping by!! Hope everyone has a sweet day!!

XO,
Tammy

Puddle Jumpers with Sunny Studio

Hello friends! I'm over on the Sunny Studio blog   with a Spring inspired box card, featuring the adorable set, Puddle Jumpers. All the ...