Sunday, August 22, 2021

Sunny Studio's 6th Birthday Blog Hop


Hello and welcome to the blog hop as we celebrate Sunny Studio's 6th birthday and upcoming Holiday release! The official holiday release date is August 27th, but in honor of their birthday, the new products will be available as a PRE-ORDER now!


Make sure to leave a comment below, and every other blog along the way, for a chance to win a $25 GC to the Sunny Studio store! Leave your comments by August 27th and winners will be announced on the Sunny Studio blog on Sunday, August 29th!

I am the last stop on the blog hop, but the full hop order will be listed at the end of this post, or you can hop over to Sunny Studio to begin!

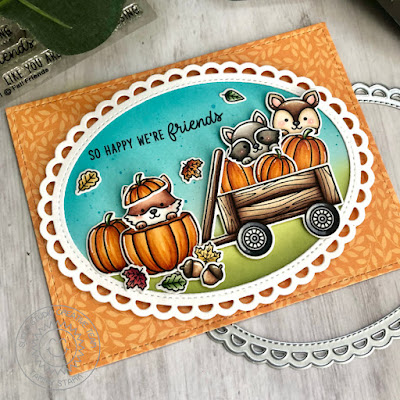
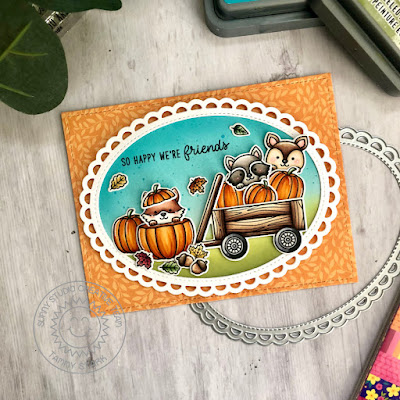
My project features the adorable brand new set, Fall Friends. I combined it with some other brand new fun products to create this fall themed card.

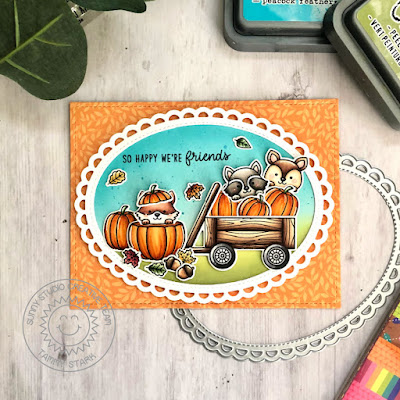
To begin, I stamped the images from Fall Friends, colored with Copic markers, and die cut with the coordinating dies. Next, I cut a white mat using the Scalloped Oval Mat 3 Dies, them placed a Stitched Oval Die in the center and ran it through my die cut machine to create a frame. I cut another stitched oval and ink blended it with Peacock Feathers, Tumbled Glass, and Peeled Paint Distress Oxide inks. I layered the Scalloped Oval frame on top of the ink blended stitched oval and attached the stamped images with foam tape to create a little scene.


Next, I stamped the sentiment from Fall Friends in black ink, then attached the scalloped oval to an A2 rectangle cut from the new Sweater Weather Paper to complete my card.


Thanks so much for stopping by today! Hope you had fun hopping! Don't forget to leave a comment here and on the other stops for a chance to win!


Sunny Studio
Vanessa
Anja
Ashley
Audrey
Franci
Isha
Julia
Kavya
Marine
Mayra
Tammy <-- you are here


Monday, August 16, 2021

Instagram Hop with Pretty Pink Posh

Hello crafty friends! We are celebrating the Pretty Pink Posh August 2021 release with a fun  two day Instagram Hop! This release may be small but it's a great one filled with Halloween products that are sure to inspire.

I'm sharing a fun project, featuring the adorable set, Monster Hugs.


To begin, I stamped, colored with Copic markers, and die cut images from the following sets:

Halloween Friends/ Coordinating Dies

Copic Colors Used:

Reds: R59, R27, R24, R14
Oranges: YR09, YR07, YR04
Yellows: Y18, Y15, Y13, Y000
Blues: BG49, BG13, BG11, BG10
Black: N6, N4, N2, N0


To create the slimline design, I cut a cardstock base to 3 1/2 X 8 1/2". I then created a fun striped background using the Simple Strips Dies and laying out the white and green stripes on a diagonal, trimming off the excess. Next, I cut a piece of Bristol cardstock using the smaller rectangle from the Slimline: Peekaboo Windows Dies. I ink blended the background with Salvaged Patina, Peacock Feathers, and Black Soot Distress Oxide inks. I then splattered some clean water onto the background, followed by some white and black acrylic paint splatters to give it some interest. I then cut a strip of black cardstock and attached to the bottom of the rectangle and attached it to the striped background. 

Next, I attached the stamped images to the background, using foam tape for dimension. I die cut the bold sentiment from black and white cardstock using the Trick or Treat Script Die  Lastly, I added some 1/4" Silver Star Confetti to complete my card!


I also created a coordinating mini card, measuring 4" square. To begin, I cut a 4 inch white card base and created a striped background, using Simple Strips Dies and laying out the white and green stripes on a diagonal, trimming off the excess. Next, I cut a rectangle to about 3 1/2" square and ink blended the background with Salvaged Patina, Peacock Feathers, and Black Soot Distress Oxide inks, splattering some clean water onto the background, followed by some white and black acrylic paint splatters. Next, I used the Boo Shaker Die to create a fun focal point for the monsters. I cut it three times from orange cardstock and once from black cardstock, layered them together, and attached to the card. Lastly, I adhered the stamped images with foam tape for dimension and added a few 1/4" Silver Star Confetti to finish!

Please head over to Instagram to participate in the IG hop and leave a comment on each stop for a chance to win a @25 gift card to PPP each day of the hop. Happy Hopping!!

Saturday, August 14, 2021

'Garden Friends' Scene Creator with Rachelle Anne Miller

Hello friends! I have a card to share, featuring the new 'Garden Friends' Scene Creator digital stamp for Rachelle Anne Miller. I love the flexibility of this adorable set! You can use a couple of the stamps, or the whole set to create a sweet scene! I chose a few of my favorite critters to create a mini scene.


To begin, I printed the digital image onto Copic friendly paper, colored the images with Copic markers, and cut them with my Scan N' Cut.

Copic Colors Used:

Bunny: W5, W3, W1, W0, W00 and R21. R00(cheeks and ears)
Hedgehog: E47, E44, E43, E42, E41 and E13, E11, E0000 (face)
Yellows: Y18, Y15, Y13, Y000
Blues: BV04, BV02, BV01, BV000
Pinks: RV66, RV55, RV02, RV000


Next, I cut Bristol smooth cardstock using a stitched rectangle die and lightly ink blended the background with Shaded Lilac Distress Oxide ink. I then die cut the grass border using Hello Bluebird's Grassy Knoll Die and ink blended it with Twisted Citron and Mowed Lawn Distress Oxide inks. I attached all the die cut images to the inked background, using foam tape on some for dimension.


 I attached the rectangle to an A2 piece of  MFT's Buffalo Brights Paper with foam tape. Lastly, I die cut the sentiment using a sentiment banner die from Lawn Fawn to complete my card.

Thanks so much for stopping by! Have a wonderful weekend!

Hugs,

Tammy


Friday, August 13, 2021

Outback Critters with Sunny Studio

Hi friends! I'm over on the Sunny Studio blog with this fun set of mini note cards, featuring the adorable set, Outback Critters. These little cards are perfect to tuck into a kid's lunchbox as a note of encouragement or just a fun little surprise to let them know you're thinking of them! 


To begin, I stamped the images from Outback Critters onto Bristol smooth cardstock, colored with Copic markers, and die cut with the Coordinating Dies. Next, I cut 3 white scalloped mats using the largest die from the Scalloped Circle Mat 1 Dies. I then cut 3 circles from Bristol cardstock using the Stitched Circle Dies, and ink blended each background with Distress Oxide inks.


Next, I cut the sand and grass borders using the Slimline Nature Borders Dies and attached to the ink blended circles, and layered them onto the white scalloped circles.


I then stamped the punny sentiments from Outback Critters onto each card before attaching the critters with foam tape. I did not attach them to a card base, as to keep it simple and less bulky. Just write your note of encouragement on the backside and tuck into your kiddos lunch or backpack! 

Thanks so much for stopping by! Do you make little notes for your kids or loved ones? Such a fun little project! Have a great day!

Hugs,

Tammy 

Wednesday, August 11, 2021

Pretty Pink Posh August Release Blog Hop


Hello friends! Welcome to day 2 of the Pretty Pink Posh August release blog hop! The new Halloween release is available now and it is Spooktacular! Make sure to read to the bottom of my post for info on the giveaway and links to today's blog hop participants!

 I created a card and set of tags, using the new Halloween Wreath and coordinating dies, combined with a couple of older sets for a fun and not-so-spooky Halloween project.


To make the card, I started by cutting an A2 rectangle and ink blended it with Stormy Sky, Faded Jeans, Chipped Sapphire, and Black Soot Distress Oxide inks. I splattered the inked background with water, then some white acrylic paint, thinned with water. 


I stamped, colored with Copic markers, and die cut images from the following sets:


I then white heat embossed the sentiment from Halloween Wreath and attached the stamped images to my card with foam tape for dimension.

Next, I created some fun coordinating gift tags.


To create the tags, I die cut Bristol cardstock using the Stitched Duo 3 Dies. I inked the background using the same inks and technique as the card. Next, I white heat embossed the sentiment from Halloween Wreath, then attached the stamped images to the tags using foam tape.

Lastly, I punched a small hole at the top of the tags and added some orange polka dot ribbon, tied with black and white bakers twine to complete my tags.

GIVEAWAY

There are 3 $25 gift certificates up for grabs (one winner each day). Winners will be picked randomly along the blog hop. Comments must be left by 11:59 PM PST on 8/16/2021. Winners will be announced on the PPP blog.

Here's a list of all the designer's participating in today's blog hop:

Tammy Stark <<< You are Here!!

Thanks so much for stopping by! Happy hopping!!

Hugs,

Tammy


Puddle Jumpers with Sunny Studio

Hello friends! I'm over on the Sunny Studio blog   with a Spring inspired box card, featuring the adorable set, Puddle Jumpers. All the ...