Wednesday, September 22, 2021

Instagram Hop with Pretty Pink Posh

 Hello crafty friends! We are celebrating the Pretty Pink Posh September2021 release with a fun  two day Instagram Hop! This amazing release is chalk full of  Fall products that are sure to inspire.

I used a combination of brand new products to create these Fall projects.

To begin, I stamped. colored with Copic markers, and die cut images from the following sets:

Copic Colors Used:
Orange: YR18, YR14, YR15, YR21
Rust: YR27, YR24, YR21, YR20
Yellow: Y26, Y23, Y21
Pink: R32, R20, R11, R00
Brown: E25, E23, E31, E30/ E44, E43, E42
Fox: E17, E15, E13, E11/W1, W00


To create my first card, I began by cutting a piece of Bristol smooth cardstock to 5 1/4" square. Using the new Leaves Background Stencil, I blended Tea Dye and Vintage Photo Distress Oxide inks, making sure to keep the center light and darker around the edges. I then cut a 5 inch square piece of vellum and attached it to the background to soften and mute the colors. Next, I arranged the die cut leaves from the Falling Leaves Stamp Set into a wreath and added the sweet little fox from the Pumpkin Patch Critters Stamp Set. Lastly, I stamped the sentiment in chocolate brown ink , then white heat embossed "greetings" onto a chocolate brown cardstock strip and placed it in the center of the wreath as a focal point. I then mounted my card onto a 5 1/2" square white cardstock base to complete my card.


To create the slimline card, I cut a piece of Bristol smooth cardstock to 3 1/4 X 8 1/4" and created the stenciled background using the Leaves Background Stencil and ink blending Tea Dye and Vintage Photo Distress Oxide inks. I then cut a piece of vellum 3 X 8" and attached it to the background. Next, I attached the Fall Circles to white scalloped circles using the Fall Circles Coordinating Dies. I lined them up and attached them to my card using foam tape for dimension. Lastly, I stamped the sentiments from Falling Leaves and Woodland Thanks exactly as I did on my first card, then attached the background to a 3 1/2 X 8 1/2" white cardstock card base to finish!

Please head over to Instagram to participate in the IG hop and leave a comment on each stop for a chance to win a @25 gift card to PPP each day of the hop. Happy Hopping!!

Friday, September 17, 2021

Chloe Number Dies with Sunny Studio

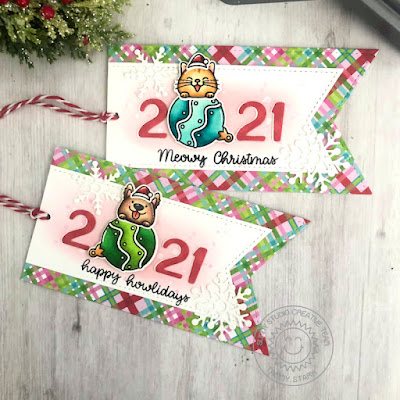
Hello! I'm over on the Sunny Studio blog sharing a fun set of Christmas tags, featuring the new Chloe Number Dies and the adorable new stamp set, Christmas Critters. This set may be my new favorite, and combined with the Chloe Number Dies, it's a fun way to make a custom keepsake tag!


To begin, I stamped the images from the Christmas Critters Stamps, colored with Copic markers, and then die cut with the Christmas Critters Dies

Copic Colors Used:

Cat: YR24, YR21, YR31, YR30, R20, R00
Dog: E29, E25, E23, E31, E50, N6, R20, R00
Red: R39, R27, R24, R14
Greens: YG67, YG17, G14, YG23, YG03, YG01
Aqua: BG49, BG13, BG11, BG10, G000


Next,  I created the tag using the Slimline Pennant Dies. Using the middle sized pennant, I cut 2 tag bases from the plaid paper using the brand new All Is Bright 6X6 Paper. I then used the smaller pennant die and cut 2 tags from Bristol smooth cardstock, then lightly inked the background with Spun Sugar Distress Oxide ink. I spattered a bit of Kitsch Flamingo ink onto the background for a bit of interest, then layered them onto the plaid background and cut the edges off to shorten the length of the tag.

I cut the red numbers from the All Is Bright 6X6 Paper  using the Chloe Number Dies and adhered to the tag, attaching the critters with the ornaments for the 0 with foam tape for dimension. I stamped the punny sentiments from Christmas Critters in black ink and added a couple of white Lacy Snowflakes to finish up my tags. Lastly, I punched a hole and strung some red and white bakers twine to complete my project!


Thanks so much for stopping by! Have a sunny day, friends!

Hugs

1 Stamp, 3 Ways - Purrfectly Wicked


Hello! I'm back with another 1 Stamp, 3 Ways post, featuring a trio of Halloween projects, my favorite holiday to design for! This month we are featuring Purrfectly Wicked from the brand new release! Head over to the Lawn Fawn blog for all the details and products used! 


Thanks so much for stopping by! Please leave your suggestions for sets you would like to see featured in the upcoming months! Have a fantastic weekend!!

Hugs,

Tammy


Tuesday, September 14, 2021

September 2021 Release Blog Hop with Pretty Pink Posh


Hello friends! Welcome to day 2 of the Pretty Pink Posh September release blog hop! The brand new Fall release is available now and it is amazing! Make sure to read to the bottom of my post for info on the giveaway and links to today's blog hop participants!

My project features a combination of sets and products from the new release to create this sweet Fall slimline scene and tag set.

To begin, I stamped, colored with Copic markers, and die cut images from the following sets:


Copic Colors Used:
Chipmunk: E47, E44, E43, E42, E41/ E53, E50, E0000/ R20, R00
Bunny: E55, E53, E51, E50, E0000
Mouse: W5, W3, W1, W00
Red: R39, R37, R35, R32
Orange: YR09, YR07, YR04, Y35/ YR18, YR04, YR02, YR01
Yellow: YR27, YR24, YR21, YR20
Green: YG97, YG95, YG93/ YG67, YG23, YG01


To create the slimline card, I began by cutting Bristol smooth cardstock using the largest die from the Slimline: Peekaboo Windows Dies. I ink blended the background using Speckled Egg and Tumbled Glass Distress Oxide inks for the sky, and Shabby Shutters and Forest Moss for the grassy edge. I splattered some Forest Moss ink, thinned with water, onto the grassy area to give a bit of interest. Next. I arranged the stamped images onto my card and attached some with foam tape for dimension. Lastly, I stamped the sentiment from Cozy Fall Critters in black ink to complete my card.


I created the tags by cutting Bristol smooth cardstock with the mat die from the new Fall Circles Coordinating Dies. I ink blended the tags using the same inks as I did the slimline card. I attached the  images from the Cozy Fall Critters and Fall Corners stamp sets to the tags using foam tape and stamped the sentiment from Woodland Thanks in black ink. Lastly, I punched a hole in the tags and threaded some jute twine to complete the tags.
GIVEAWAY

There are 3 $25 gift certificates up for grabs (one winner each day). Winners will be picked randomly along the blog hop. Comments must be left by 11:59 PM PST on 9/19/2021. Winners will be announced on the PPP blog.

Here's a list of all the designer's participating in today's blog hop:

Tammy Stark<<< You are Here!

Thanks so much for stopping by! Happy Hopping!!

Hugs

Thursday, September 9, 2021

Ghostly Halloween with Hello Bluebird

Hello! I'm over on the Hello Bluebird blog with a not-so-spooky all die-cut Halloween card featuring items from the brand new release! Head on over to the blog for all the details and supplies used!

Thanks for stopping by! Have a great day!

Hugs

Tuesday, September 7, 2021

Hello Bluebird Day 3 Previews - Boo Crew

Hello and welcome to Day 3 of previews for the brand new Hello Bluebird release available tomorrow, September 8th at 7pm MST! Today, the design team is has some adorable Halloween inspiration to share? My card features the new set, Boo Crew...an adorable set featuring some not-so-spooky trick-or-treaters!


To begin, I cut a piece of Bristol smooth cardstock to 3 1/2 X 8 1/2". I cut the moon from the new Full Moon Die and used it as a mask, blending Milled Lavender, Wilted Violet, Blueprint Sketch, and Black Soot Distress Oxide inks. I splattered some water onto the background, then some thinned down white acrylic paint to add some interest to the background. Next, I cut the grassy border and the frame from black cardstock using the Summer Woods Scene Die, adding some Birch Trees before adhering it to my background.


Next, I stamped the images from Boo Crew, colored with Copic markers, and die cut them using the Boo Crew Dies. 

Lastly, I arranged the images onto my card, attaching them with foam tape for dimension. I stamped the sentiment in black ink and added a couple of bats to complete my card.


Thanks so much for stopping by! Be sure to head on over to the Hello Bluebird blog and leave a comment on today's post for a chance to win a $50 gift certificate to the shop. You have until 4 PM MST on September 8th to leave your comments. The winner will be announced by 5PM MST on Wednesday the 8th!

See you tomorrow for release day!!

Hugs


Monday, September 6, 2021

Hello Bluebird Day 2 Previews - Tree Neighbors

Hi there! Welcome to Day 2 of previews for the brand new Hello Bluebird  release, which will be available September 8th at 7pm MST. Today I'm featuring one of my favorite sets, Tree Neighbors...it's soo adorable, I can hardly stand it! I paired it with the brand new awesome High Rise Tree Scene Die. The possibilities are endless with this! I cant wait to create some holiday cards with this set and die!

For my card, I decided to go for an autumnal scene. To begin, I cut a piece of Bristol smooth cardstock to 3 1/2 X 8 1/2" and ink blended the background with Abandoned Coral, Dried Marigold, and Squeezed Lemonade Distress Oxide inks, splattering some water onto the background for a bit of interest. Next, I die cut the tree from the High Rise Tree Scene Die using brown woodgrain paper. I ran the die through my die cut machine again, this time using white Bristol cardstock. I ink blended the leaves and grassy area with Shabby Shutters and Peeled Paint Distress Oxide inks. I adhered the frame (3 cut and stacked together) on top of my inked background, then attached the grass, and layered the tree over dark brown cardstock and attached with foam tape.

Next, I stamped the images from the Tree Neighbors stamp set, colored with Copic markers, and die cut with the Tree Neighbors die. Lastly, I arranged the critters and leaves onto my card, using foam tape for dimension, to complete the scene!

I hope you enjoyed the Day 2 previews! Head on over to the Hello Bluebird blog to see all of the items being previewed today and the awesome design team inspiration! Be sure to leave a comment over on the HB blog for a chance to win a gift certificate to the shop! I'll see you tomorrow for Day 3 Previews...they're SPOOK-tacular!!

Hugs


Sunday, September 5, 2021

Hello Bluebird Day 1 Previews - Park Play

Hello friends! Welcome to the first day of previews for the new Hello Bluebird release, available September 8th at 7pm, MST. My card today is featuring the brand new stamp set called Park Play AND the much anticipated new Nesting Mini Slimline Dies! 


To begin, I cut Bristol smooth cardstock using the largest die from the Nesting Mini Slimline Dies. I lightly blended the background with Salty Ocean and Tumbled Glass. Next, I cut the grass and trees using the Summer Woods Scene Die, which is so easy to modify to use on a mini slimline scene! I ink blended the grass and trees with Shabby Shutters and Peeled Paint Distress Oxide inks. I added some Rustic Wilderness ink to the edges to darken it up, then splattered some Peeled Paint, thinned with water, onto the grass and foliage to create some interest. Once I adhered the background scenery to the background, I cut a white frame using the Nesting Mini Slimline Dies and attached it using foam tape for dimension.


Next, I stamped the images from Park Play, colored with Copic markers, and die cut with the Park Play Dies. I stamped the sentiment in black ink then attached the colored images to my card using foam tape to complete my card!


Thanks so stopping by! Be sure to head over to the Hello Bluebird blog for more inspiration from the design team and leave a comment for a chance to win a gift card! I'll see you tomorrow for Day of previews!! Have a great day!

Hugs,
Tammy

Friday, September 3, 2021

Forest Trees Stencils with Sunny Studio

Hello! Today I am over on the Sunny Studio blog with a Christmas card featuring the brand new, Forest Tree Stencils. I love that it has 3 stencils that layer perfectly to create the look of a lush forest, or you can use them individually to create a single row of fir trees! 


To begin, I cut an A2 piece of Bristol smooth cardstock and ink blended the top with Chipped Sapphire, Faded Jeans, and Stormy Sky Distress Oxide inks. Next, I placed the Forest Trees Stencils and ink blended Pine Needles, Evergreen Bough, and Picket Fence Distress Oxides to create the forest background. I then splattered some water onto the top part of the inked panel, then added some white acrylic paint onto the entire background to give it the look of fresh fallen snow.


Next, I stamped, colored with Copic markers, and die cut the images from the following sets:


I attached the stamped images to the background using foam tape for dimension.


To complete my card, I die cut white cardstock using the Fancy Frames Rectangle Dies and attached to my card to frame the scene. Lastly, I white heat embossed the sentiment onto a strip of black cardstock to finish!

Thanks so much for stopping by! Have a fantastic weekend!

Hugs, 

Tammy


Puddle Jumpers with Sunny Studio

Hello friends! I'm over on the Sunny Studio blog   with a Spring inspired box card, featuring the adorable set, Puddle Jumpers. All the ...