Friday, October 29, 2021

Holiday Express with Sunny Studio

Hello friends! I'm over on the Sunny Studio blog sharing this fun holiday card, featuring Holiday Express.  Santa and his reindeer are traveling by train this year to deliver all the Christmas packages, haha! 


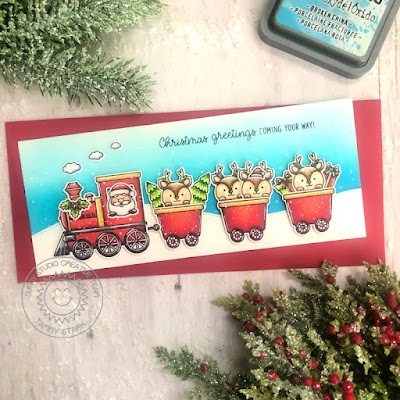
To begin, I cut a piece of Bristol smooth cardstock to 3 1/2 X 8 1/2" and ink blended the background with Peacock Feathers, Broken China, and Tumbled Glass Distress Oxide inks. I cut a snowy border using the Slimline nature Borders Dies, lightly inking the edge with Tumbled Glass ink before attaching to the bottom of the inked background. Next, I splattered white acrylic paint onto the background for a snowy effect.

I stamped the images from Holiday Express, colored with Copic markers, and die cut with the Holiday Express Dies. I then splattered white acrylic paint, thinned with water, onto the die cut images to give the appearance of freshly fallen snow.


Next, I attached all the images to my card, using foam tape for dimension. Lastly, I stamped the sentiment in black ink across the top of my card then attached it to a 3 1/2 X 8 1/2 white card base to complete my card. 

Thanks so much for stopping by! Have a wonderful weekend!

Hugs,

Tammy

Thursday, October 21, 2021

Hello crafty friends! We are celebrating the Pretty Pink Posh October 2021 release with a fun 3 day Instagram Hop! This amazing release is chalk full of winter and holiday themed products that are sure to inspire.

I used a combination of brand new products to create these holiday projects.


To begin, I stamped. colored with Copic markers, and die cut images from the Winter Circles Stamp Set.

Copic Colors Used:
Reindeer: E41, E42, E43, E44. R14
Penguin: C7, C5, C3, C1, C00, R39, R37, R35, R14, YG17, YG23, YG03, YG01
Holly: R14, R35, R39, YG67, YG23, YG03, YG01, YG00
Snowman: BG11, BG10, YR04, R14, R35, R39, YG17, YG23, YG03, YG01


To create the slimline card, I began by cutting white cardstock using the 2 largest dies from the Slimline: Peekaboo Windows Die. Next, I created a candy cane striped background using the Simple Strips Dies. I cut red cardstock using the thinnest strip and the second to thickest strip, then arranged them onto the smaller white rectangle, trimming the edges as I went along. Next, I die cut the colored images from the Winter Circles Stamp Set using the Winter Circles Coordinating Dies, layering them onto green scalloped circles also cut with the coordinating dies. To complete my card, I white heat embossed the sentiment from the Holiday Scripts Stamp Set onto black cardstock, die cutting it with the Coordinating Dies, and stamping "Christmas" onto a white cardstock strip in black ink to finish it up.


I also created some fun and super simple candy cane holders also using the Winter Circles Stamp Set. I used the Stitched Gift Card Holders Dies to cut the base for the candy canes from red and green cardstock. Next, I layered the darling images onto the scalloped circled from the Coordinating Dies, and attached them to the gift card holder using foam tape. I then white heat embossed the sentiments from Holiday Scripts Stamp Set onto black cardstock strips and attached them to the front. Lastly, just slide the candy canes through the gift card slots to finish! These would be adorable little favors for a kid's classroom, co-workers, neighbors, etc. 


Thanks so much for stopping by! Please head over to Instagram to participate in the IG hop and leave a comment on each stop for a chance to win a $25 gift card to PPP each day of the hop. Happy Hopping!!

Saturday, October 16, 2021

Lawn Fawn for Simon Says Stamp

Hi friends! I'm so excited to be on the Simon Says Stamp blog with a project highlighting some brand new Lawn Fawn products! I created a sweet slimline card and coordinating tag featuring some adorable mice, decking the halls for the holidays!


To begin, I stamped, colored with Copic markers, and die cut images from the following sets to create the slimline card and tag:

Christmas Dreams Stamps and Dies (Tree on card and tag)
Cheery Christmas Stamps and Dies (Hat on card and tag)

Next, I die cut the red paper from the Let It Shine Snowflakes Paper using the Slimline With Sliders Die. I then cut a snowy border from white cardstock using the Slimline Stitched Hillside Borders, lightly inking the edges with Tumbled Glass Distress Oxide ink before adhering to the red background. Next, I framed the scene by cutting white cardstock using the Portrait Scalloped Slimline with Hearts. I then placed the largest die from the Slimline die and ran it through my die cut machine to create a frame. 


I die cut the snowflake from white cardstock 3 times using the Magic Iris Snowflake Add-On and stacking them together for some dimension. Next, I white heat embossed  the sentiment from Magic Holiday Messages onto Vellum, then hand cut it and adhered behind the snowflake before attaching it to the center of my card. I then arranged the colored images onto my card, attaching with foam tape for dimension. Lastly, I added some Mini Snowflakes to complete my card.


The scalloped tag was created by using the Window Scene Winter Dies. I cut scalloped base from white cardstock and the used the smaller rectangle die to cut the red patterned background from the Let It Shine Snowflakes Paper. I then die cut a snowy border using the Simple Stitched Hillside Border Dies from white cardstock and lightly inking the edges with Tumbled Glass Distress Oxide ink before adhering to the red background. I attached the colored images to the tag using foam tape for dimension and added a few Mini Snowflakes. Lastly, I punched a hole at the top of the tag and added some Peppermint Cord for the finishing touch!


Thanks so much for stopping by! I hope you were inspired to create some holiday projects with the new Lawn Fawn release at Simon Says Stamp!

Hugs,

Tammy


Friday, October 15, 2021

Christmas Critters with Sunny Studio

Hello friends! Today I'm over on the Sunny Studio blog  sharing these festive holiday gift tags, featuring the adorable set, Christmas Critters. 


To begin, I stamped the images from Christmas Critters, colored with Copic markers, and die cut with the Christmas Critters Dies. Next, I cut the tag bases from the All Is Bright 6X6 Paper using the Scalloped Tag Circle Dies. I then cut a white circle using the Stitched Circle Dies and layered it onto the tag bases. Next, I cut a smaller circle from black cardstock, again using the Stitched Circle Dies. I white heat embossed snowflakes from Penguin Pals, then splattered some white acrylic paint onto each black circle to give them a nice snowy look before layering them onto the tags.


Next, I attached the colored images to the tags using foam tape for dimension. I stamped the punny sentiments from Christmas Critters and Merry Mice in black ink onto white cardstock strips.


Lastly, I added some red bakers twine and the sentiment strips for the finishing touch! These tags would be such a fun way to add a handmade touch to any package or treat! 

Thanks so much for stopping by. Have a wonderful weekend!

Hugs, 

Tammy

Wednesday, October 13, 2021

October 2021 New Release Blog Hop with Pretty Pink Posh


Hello friends! Welcome to the Pretty Pink Posh October release blog hop! The brand new holiday release is available now and it is amazing! Make sure to read to the bottom of my post for info on the giveaway and links to today's blog hop participants!

I absolutely love snowmen, so when I saw the new Snowmen Friends stamp set, it was love at first sight! My project features a slimline card and snow globe tags showcasing these cuties.


To create the slimline card I began by stamping the images from Snowmen Friends, coloring with Copic markers, and die cutting them with the Snowmen Friends Coordinating Dies. Next, I cut a piece of Bristol smooth cardstock using the largest die from the Slimline: Peekaboo Windows Dies. I ink blended the background using Speckled Egg Distress Oxide ink, applying it darker around the edges. I then placed the Snowfall Stencil onto the inked background and applied white stenciling paste to give it a beautiful textured look. Next, I cut 2 white birch trees using the Nature Essentials Die, lightly inked the edges with Tea Dye Distress Ink, and attached them to the background. I used the Stitched Borders 1 Dies to create the snowy hills, lightly inking the edges with Speckled Egg ink before attaching to the background. 

Next, I arranged my Snowmen Friends onto my card and attached them with foam tape for dimension. I then used the new Let It Snow Script Die, layering red cardstock over white to create a nice, bold sentiment for my card. Lastly, I stamped the snowflakes from the set with Speckled Egg ink and attached for the finishing touch.


To create the tags, I simply cut a circle from Bristol smooth cardstock and ink blended the background with Speckled Egg Distress Oxide ink. I then added a textured background using white stenciling paste over the Snowfall Stencil. I used the Stitched Borders 1 Dies to create the snowy hills, lightly inking the edges with Speckled Egg ink. The snow globe bases were made by cutting red paper with the largest 
Simple Strips Die. I cut each strip at an angle then white heat embossed the sentiment from Holiday Scripts stamp set and attached to the bottom of the circle. I added some cuties from Snowmen Friends and some snowflakes, stamped with Speckled Egg ink, to each tag. Lastly, I punched a hole at the top of each snow globe and threaded them with red bakers twine to complete my tags.

GIVEAWAY

There are 3 $25 gift certificates up for grabs (one winner each day). Winners will be picked randomly along the blog hop. Comments must be left by 11:59 PM PST on 10/19/2021. Winners will be announced on the PPP blog.

There's also a FREE gift with purchase over $125 on the Pretty Pink Posh website!!


Here's a list of all the designer's participating in today's blog hop:

Tammy Stark <<< You are HERE!

Thanks so much for stopping by. Happy Hopping!


Sunday, October 3, 2021

Halloween Theme Week with Pretty Pink Posh

Hi friends! I'm excited to be wrapping up Halloween Theme Week over at Pretty Pink Posh!  I have a fun project to share, using the new Halloween Circles  stamp set.

**All items in the Halloween Section are 15% during theme week!


I LOVE creating little favors and gifts, so I had fun creating these little Halloween Lollipops! To begin, I stamped the images from Halloween Circles , colored with Copic markers, and die cut with the coordinating dies. I then attached the die cut images onto the black cardstock pinked circles. Next, I created the lollipop covers...you guys, they are sooo easy! You could easily mass produce these for the kiddos Halloween class parties, trick-or-treaters, or even co-workers!

Here's a step-by-step photo tutorial:


First, cut 2 of the mats from the Halloween Circles Coordinating Dies and score at the first angle as shown in picture.


Next, attach them together, lining it up with the score line as shown. Punch a hole in the center and fold towards the center so it makes a little tent.


Insert the lollipop through the punched hole. Just a note: these lollipops were a bit too large in diameter, so I folded down the edges so they didn't peek out the sides. 


Put a glue dot on both sides of the lollipop and fold it up to close.


Once all the lollipop holders were made, I added the Halloween Circles to each one with foam tape. Next, I stamped the sentiment from Monster Hugs onto a white cardstock strip and attached to the front of the lollipop. Lastly, I tied a piece of black ribbon to each lollipop to add a special touch!


Thanks so much for stopping by! I hope you enjoyed Halloween Theme Week and you are inspired to make some "spooky" treats!

Hugs,

Tammy

Friday, October 1, 2021

Fall Friends with Sunny Studio

Hi there! Today I'm over on the Sunny Studio blog with this sweet Fall themed slimline card, featuring the adorable set,  Fall Friends. 


To begin, I cut a piece of Bristol smooth cardstock using the Stitched Mat Die from the Slimline Scalloped Frame Dies. I blended some Peacock Feathers and Tumbled Glass Distress Oxide inks onto the background, then added a grassy border cut from the Slimline Nature Borders Dies I ink blended the grassy border using Scattered Straw and Gathered Twigs Distress Oxide inks. 


Next, I stamped the images from  Fall Friends, colored with Copic markers, and die cut with the Fall Friends Dies. I arranged the colored images onto my card using foam tape on some for dimension. I then stamped a sentiment from Harvest Mice onto a strip of white cardstock with marmalade ink. Lastly, I adhered the background to a dark kraft Scalloped Frame, then onto a white card base to complete my card.


Thanks so much for stopping by! Have a wonderful weekend!!

Puddle Jumpers with Sunny Studio

Hello friends! I'm over on the Sunny Studio blog   with a Spring inspired box card, featuring the adorable set, Puddle Jumpers. All the ...