Saturday, May 21, 2022

Baby Elephants with Sunny Studio

Hello friends! I'm thrilled to be guest designing today with Sunny Studio's newest release. I absolutely adore this new release and have a few projects to share using one of my favorite sets, Baby Elephants.


For my first project, I created a pair of baby cards. How sweet are these images? So cute, I had to make both a baby girl and baby boy version!

To begin, I stamped the images from Baby Elephants, colored with Copic markers, and die cut the colored images using the Baby Elephants Dies


Next, I die cut 2 white scalloped mats using the Slimline Scalloped Frame Dies. I then cut the smaller panels from Bristol smooth cardstock and ink blended the backgrounds with Kitsch Flamingo and Spun Sugar (baby girl card) and Peacock Feathers and Tumbled Glass (baby boy card). I then stamped the sentiments onto the cards using black ink and arranged the colored images onto the cards, attaching some with foam tape for dimension. Lastly, I adhered my completed card to a white card base to finish up. 


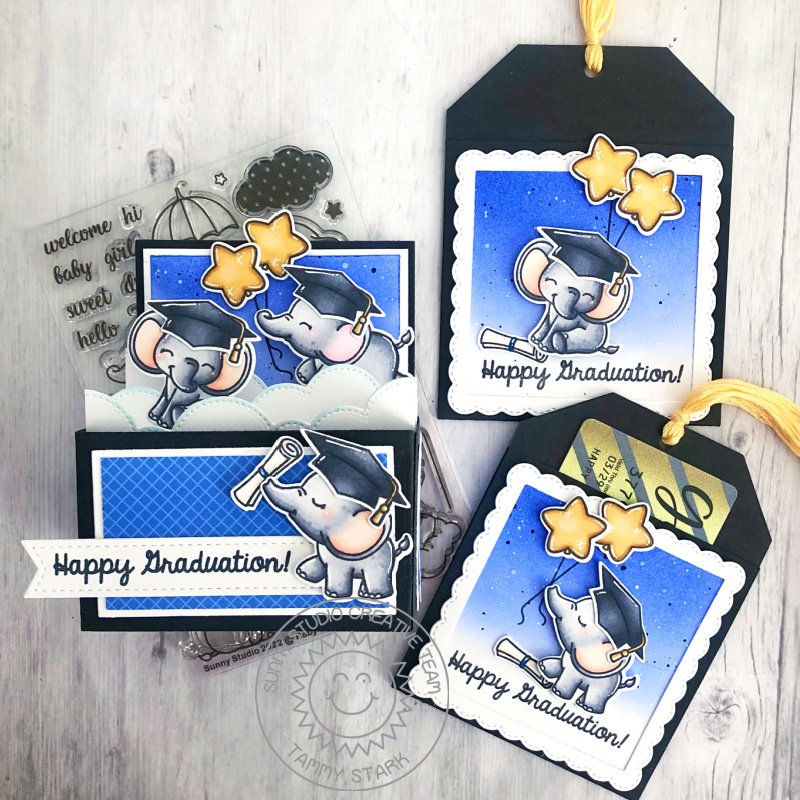
I just love how versatile this stamp set is! I had fun creating some grad themed projects with Baby Elephants.


To begin, I stamped, colored with Copic markers, and die cut images from the following sets:

Woo Hoo/ Coordinating Dies


My first project is a fun box card. I began by die cutting a basic box die using black cardstock and assembled it. The back panel of the box is ink blended with Blueprint Sketch Distress Oxide inks, which I then splattered with some white and black acrylic paint that was thinned with water. Next, I cut some cloud borders using the Slimline Nature Borders Dies from white cardstock and trimmed them to fit the width of the box. I then cut a rectangle panel using the blue patterned paper from the Classic Gingham 6X6 Paper, matted it with white cardstock, and attached it to the front of the box. I stamped the sentiment from Woo Hoo onto the smallest pennant from the Slimline Pennant Dies and cut to fit the front of the box. Lastly, I arranged the stamped images, attaching some with foam tape for dimension.


I also created some coordinating gift card holders; perfect for presenting a gift card or money to the grad!


To begin, I stamped, colored with Copic markers, and die cut images from the following sets:


Next, I created the gift card holders simply by cutting a piece of black cardstock 3 1/2 X 7", scoring at 3 1/2" from the bottom. I created the tag shape using the Tag Topper Die - Traditional. I then folded on the score line and placed red line tape on the sides to create a pocket. Next, I cut 2 white scalloped square frames using the Fancy Frames Stitched Dies. I attached the frames over a square of Bristol smooth cardstock, ink blended with Blueprint Sketch Distress Oxide ink, which I then splattered with some white and black acrylic paint that was thinned with water. I stamped the sentiment from Woo Hoo in black ink, then attached the stamped images using foam tape. Lastly, I finished off the gift card holders with a fun tassel, made from embroidery floss.

Thanks so much for stopping by and thanks to Sunny Studio for having me! I hope you enjoyed my projects! 

Hugs,
Tammy

Monday, May 16, 2022

Pretty Pink Posh - May 2022 Release Blog Hop

 Hello friends! I'm so excited to be joining in on the blog hop to celebrate the Pretty Pink Posh May Release!  The brand new release is available now and it is amazing! 


If you're following along with the blog hop, you should have arrived here from Nichol Spohr's blog.      Make sure to read to the bottom of my post for info on the giveaway and links to today's blog hop participants!

My project features the adorable new sets, Crafty Critters, Crafty Days, and Crafty Sentiments, perfect for the crafty friends in your life! I created a fun slimline card and gift card holders, with a fun stenciled rainbow striped background.


To begin, I cut a panel of Bristol smooth cardstock to 3 1/4 X 8 1/4" and created a rainbow stripe background using the new Pinstripe Stencil and Distress Oxide inks in Picked Raspberry, Carved Pumpkin. Squeezed Lemonade, Twisted Citron, Salty Ocean, and Wilted Violet. Next, I stamped the images from Crafty Critters and Crafty Days and colored them with Copic markers. Next, I die cut the colored images with the Crafty Critters Coordinating Dies and Crafty Days Coordinating Dies. I layered the Crafty Days square images onto bright pink scalloped squares cut using the Crafty Days Coordinating Dies and attached them to the striped background using foam tape for dimension. I then stamped the sentiment from the Crafty Sentiments stamp set in black ink onto the background. Lastly, I matted the striped background to white cardstock and the again onto black cardstock cut to 3 1/2 X 8 1/2" to finish up my card.

Next, I created custom gift card holders. These are so quick and simple to make and really add a special touch when giving a gift card! To begin, I cut white cardstock 3 1/4" wide X 6 3/4" long, scoring at 3". I applied red line tape along the edges and folded along the score line to create the pocket. Next, I trimmed the top to create a tag shape, then punched a hole. I then stenciled a piece of Bristol smooth cardstock cut to 3 X 3" using the Pinstripe Stencil and Distress Oxide inks as described above. I die cut 
bright pink scalloped squares cut using the Crafty Days Coordinating Dies and attached a die cut square, lightly ink blended with Tumbled Glass Distress Oxide ink. Next, I attached the images from Crafty Critters onto the squares using foam tape, then stamped the sentiment "happy" in black ink and white heat embossed "crafting" onto black cardstock. Lastly, I added some bright pink dotted ribbon for a fun touch!
GIVEAWAY

There are 3 $30 gift certificates up for grabs (one winner each day). Winners will be picked randomly along the blog hop. Comments must be left by 11:59 PM PST on 5/22/2022. Winners will be announced on the PPP blog.

Here's a list of all the designer's participating in today's blog hop:

Tammy Stark----You are HERE
 
Thanks so much for stopping by! Happy Hopping!!

Sunday, May 1, 2022

Color Challenge 2 with Hello Bluebird

 Hi friends! We are so excited for May's color challenge over at Hello Bluebird! Take inspiration from this rich and bold palette featuring teal, leaf green, saffron yellow, and guava; a gorgeous combination for bright Spring projects! A little shout out to my super-talented daughter, Avery, for creating this gorgeous color board!


I was inspired to create a fun, and cheerful box card, featuring the adorable set, Best Days.


To begin, I stamped the images from Best Days, colored with Copic markers, and die cut with the Best Days Die.  The clouds and larger bee are from the Park Play Stamp set/ Park Play Die. Next, I cut the box from guava cardstock using the MFT Mini Slimline Outside the Box Level Up Die. I ink blended the grassy borders using Twisted Citron and Mowed Lawn Distress Oxide inks and attached them to the inside of the box. The background was ink blended with Peacock Feathers and Tumbled Glass, then splattered with Peacock Feathers, thinned with water, to create a bit of interest.


Once the box was fully assembled, I attached the stamped elements, using foam tape on some for dimension. Lastly, I die cut a white sentiment strip and stamped the sentiment from Best Days in jet black ink and attached it to the front of the box. I added the adorable Corgi and bee using foam tape for the finishing touch.

Be sure to head over to the Hello Bluebird Blog for the Challenge Rules and details (for a chance to win a $50 gift certificate to the Hello Bluebird shop), and more inspiration from the design team!

Thanks so much for stopping by! I can't wait to see what you all create for our #hellobluebirdcolorchallenge2

Hugs,
Tammy


Thursday, April 28, 2022

Unicorn Tales with Hello Bluebird

Hello friends! I'm over on the Hello Bluebird blog sharing this magical card and coordinating mini gift boxes, featuring Unicorn Tales.  

Be sure to head over to the blog for all the details and supplies used.

Thanks for stopping by! Have a great day!

Hugs,

Tammy

Saturday, April 23, 2022

Lawn Fawn for Simon Says Stamp

Hi friends! I'm so excited to be on the Simon Says Stamp blog with a project highlighting some brand new Lawn Fawn products! I created a sweet slimline card and featuring some adorable mice, frolicking in a strawberry patch!


To begin, I die cut a piece of Sticky Note Cardstock using the Portrait Scalloped Slimline with Hearts Die to create a scalloped rectangular base for my card. Next, I cut a piece of white cardstock to fit inside the scalloped rectangle and then cut the pink floral patterned paper from the Flower Market 12x12 Paper Pack to approximately 3X8" and layered it onto the white mat.

Next, using Bristol smooth cardstock, I die cut the berries, vines, and basket with the Strawberry Patch Die Cuts and Fruit Basket Die Cut. I ink blended the berries with Spun Sugar, Worn Lipstick, and Candied Apple  Distress Oxide inks, then layered them onto Black Licorice Cardstock. The leaves and strawberry tops were ink blended with Shabby Shutters and Mowed Lawn Distress Oxide inks.


Next, I stamped, colored with Copic markers, and die cut the images from the following sets:


I then arranged all the die cut berries and stamped images onto my card, using foam tape for dimension. I created a custom "berry" sentiment using the Scripty Be Die and Scripty Merry Die. I die cut the words using Bristol smooth cardstock and ink blended it the same as I did the berries. I cut off the "M" from the merry die cut and the "E" from the be die cut and layered them together.


Lastly, I stamped the sentiment from Berry Special onto white cardstock strips using Jet Black Ink to complete my card.

Thanks so much for stopping by! I hope you were inspired to create something "berry" special with the new Lawn Fawn release at Simon Says Stamp!

Hugs,

Tammy


Friday, April 1, 2022

Color Challenge 1 with Hello Bluebird

Hi friends! We are so excited to announce new monthly design challenges over at Hello Bluebird! Our first challenge is a color challenge. Take inspiration from this gorgeous pastel palette featuring pastel pink, buttercup yellow, mint green, and lavender; perfect for your Spring and Easter projects! A little shout out to my super-talented daughter, Avery, for creating this gorgeous color board!


I was inspired to create a sweet Easter themed card, featuring the adorable critters from Little Painters.


To create my card, I cut a panel of Bristol smooth cardstock to 3 1/2 X 8 1/2" and ink blended the background with Kitsch Flamingo and Spun Sugar Distress Oxide inks. Next, using the Summer Woods Scene Die, I die cut Bristol smooth cardstock (grass, bushes, and treetops), and kraft cardstock (tree trunks). I blended Cracked Pistachio and Mowed Lawn Distress Oxide inks onto the grassy borders, bushes, and tree foliage, splattering with some Mowed Lawn ink (thinned with water) to add some interest. I then lightly inked the kraft tree trunks with Vintage Photo Distress Oxide ink and attached all of the die cut elements onto my pink inked background to create a fun backdrop.

Next, I stamped the images from Little Painters, colored with Copic markers, and die cut with the Little Painters Die.
Additional stamp sets used:

Copic Colors:
Bunnies: W5, W3, W1, W00, RV02, RV10, RV00
Chicks: Y18, Y15, Y13, Y000
Hedgehog: E57, E55, E53, E51, E50, E0000
Pinks: RV02, RV10, RV00
Greens: G02, G00, G000
Lavender: V04, V12, V01, V000

I then arranged the color images onto my card, attaching with foam tape for dimension. Lastly, I stamped the sentiment from Spring Gatherings in black ink to complete my card.

Be sure to head over to the Hello Bluebird Blog for the Challenge Rules and details (for a chance to win a $50 gift certificate to the Hello Bluebird shop), and more inspiration from the design team!

Thanks so much for stopping by! I can't wait to see what you all create for our #hellobluebirdcolorchallenge1

Hugs,
Tammy


Wednesday, March 16, 2022

Pretty Pink Posh - March 2022 Release Blog Hop

Hello friends! I'm so excited to be joining in on the blog hop to celebrate the Pretty Pink Posh March Release!  The brand new Spring and Easter release is available now and it is amazing! 


If you're following along with the blog hop, you should have arrived here from Yoonsun Hur's blog.        Make sure to read to the bottom of my post for info on the giveaway and links to today's blog hop participants!


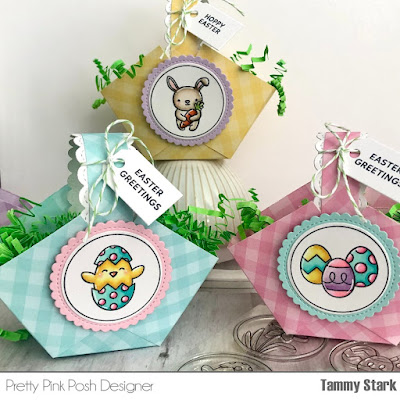
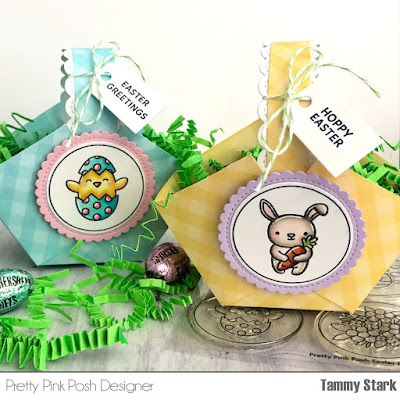
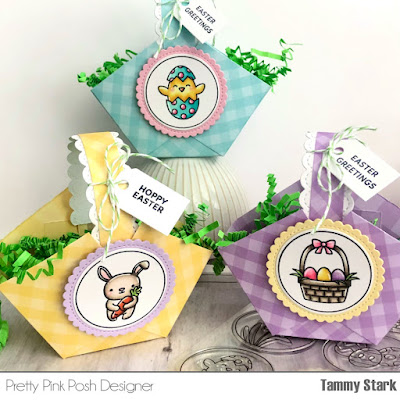
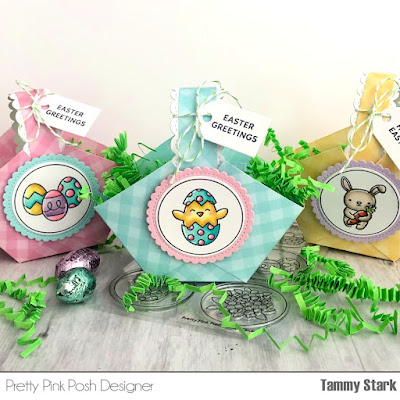
For my project, I created some fun little Easter treat baskets, using the brand new Easter Circles Stamp Set. If you've been following me for a while, then you know my love for creating special little favors for the holidays and special occasions. I just love this collection of circle stamps, and the addition of the Easter designs is adorable!! I will be reaching for this one for years to come!

To begin, I stamped the Easter Circles onto Bristol smooth cardstock, colored with Copic markers, and die cut with the Easter Circles Coordinating Dies. I then attached the die cut Easter Circles onto different colored pastel scalloped circles cut using the Valentine Circles Coordinating Dies.


Next, I created the baskets. I cut patterned paper to 6 X 6" and scored at 2" and 4". I turned my paper and scored again at 2" and 4", creating a square grid with 9 equal 2" squares. I then cut along the first score line on all four sides (up to the first score line)to create a flap. Then I folded along all the score lines with a bone folder, and attached the cut ends of the squares at an angle to form a basket shape. Next, I cut a strip of patterned paper 3/4" W X 8" L to create the handles for the baskets. I added a white scalloped edge to the handles using the Stitched Borders 4 and attached them to the baskets using red line sticky tape. You can also use a small brad to attach the handles, but I didn't have any on hand, lol.


Once my baskets were assembled, I attached the Easter Circles to the front using foam tape for a bit of dimension and sturdiness. I die cut little white tags from the Tulip Cover Plate Die and stamped sentiments from the Easter Signs Stamp Set and Easter Wreath Stamp Set and tied them onto the baskets with some bakers twine to complete my project! 


GIVEAWAY

There are 3 $25 gift certificates up for grabs (one winner each day). Winners will be picked randomly along the blog hop. Comments must be left by 11:59 PM PST on 3/20/2022. Winners will be announced on the PPP blog.

Here's a list of all the designer's participating in today's blog hop:

Tammy Stark---->>>YOU ARE HERE!

Thanks so much for stopping by! Happy Hopping!!


Sweet as Can Bee with Sunny Studio

Hello friends! Tammy here with a fun project featuring the adorable set, Sweet as Can Bee.   I decided to create a cute tea pocket and musl...