Friday, November 29, 2019

25 days of Christmas Tags - Hello Bluebird

Hi Crafty friends! I'm excited to be joining Tracey McNeely for her annual 25 Days of Christmas Tags event.
Be sure to visit her blog for more tag inspiration from other amazing designers!

Today , on the last day of the event, I'm sharing tags I've created with Hello Bluebird products. I have a couple different tags, so keep reading!


I started by cutting my tags from white Bristol smooth cardstock. I used Distress Oxide inks in Evergreen Bough and Peacock Feathers to color my background. Using a paintbrush, I splattered some watered down white acrylic paint to create some snow.

Next, I stamped images from the First Snow stamp set . I colored the images with Copic markers and cut them out using the coordinating First Snow Die.  I then cut my snowy hills from white cardstock using the Hill and Dale Die.  I cut down to fit my tag, added some chunky glitter to the edge and attached to tag.
I adhered the colored images to my tags with dimensional foam squares. I added the sweet sentiments and snowflakes from the Snow Play stamp set to the tags by embossing them with white embossing powder.


Finally, I finished off my tags by adding  red polka dot ribbon and tied on a jingle bell with some white twine.

My second set of tags were made to look like little snowglobes, using the Frosty Littles Stamp set, one of my all time favorite sets!


I started by cutting three tag bases from white cardstock, using  THIS die. Next, using Bristol smooth cardstock, I cut three circles to create my background. Using Distress Oxides, I ink blended each circle using Broken China, fading into Tumbled Glass. I splattered some white acrylic paint onto my background for a snowy effect and added some white embossed snowflakes and set aside.


Next, I stamped out images from the Frosty Littles Stamp set onto Bristol smooth cardstock. I colored my images with Copic markers, and cut them out using the Frosty Littles Die.  Now, it's time to put the snowglobes together.  First, attach the ink blended circle to the tag base. Then, cut 3 more circles from white cardstock, and using the Hill and Dale Die, cut your snowy hills and attach to your tag.  I arranged my stamped images to my liking, and attached them using dimensional foam. Finally, from black cardstock, cut your snowglobe base using THIS die.  I heat embossed the Season's Greeting sentiment from the O Christmas Tree Stamp  set with white embossing powder and attached to the bottom of the tag with a strong adhesive. I finished off the tags by attaching a sparkly silver bakers twine, keeping it simple.

Thanks so much for stopping by today! 

Tammy XO


Monday, November 25, 2019

Frosty Friends With Hello Bluebird


Happy Monday, friends!  Today, I'm sharing this card featuring the Frosty Friends stamp  over at the Hello Bluebird blog. Please stop to say Hi and to see how I made this fun, bright Holiday card!


Thanks for stopping by...see you soon!

Tammy XO

Sunday, November 24, 2019

25 Days of Christmas Tags with Lawn Fawn

Hi Friends! I'm so excited to be joining Tracey McNeely for her annual 25 Days of Christmas Tags event.  If you haven't already, please stop by her blog....she has worked so hard to organize this amazing event!

Today, I'm sharing tags I have created with Lawn Fawn products. I had so much fun creating these whimsical tags using a variety of dies.


I started by die cutting  2 different size circles from white cardstock using the outside in stitched circle stackables(this will be the snowman's head- cut 2 for each snowman), and the large stitched circle stackables(the body). I glued them together to create my snowman. Next, we'll cut all the accessories. I cut the hat, scarf, holly from the woodland critter huggers winter add-on die using ballet slippers, chili pepper, mermaidcilantro, and pixie dust sparkle  cardstock. I assembled the hats and scarves and set aside.


Next, I cut the pieces for the snowman's face. For the eyes, mouth, and cheeks I used the stitched cloud frames.  I cut the large carrot nose from canned pumpkin cardstock using the smallest feather from the tiny gift box peacock and turkey add-on! I added a bit of glitter along the edge of the nose for some sparkle.


I assemble the snowman faces, adding some foam tape on the nose and holly for extra dimension. I attached the scarves with tape runner, covering up the seams where the circles meet.  Next, I added my sentiment across the bottom. I cut black cardstock using the simple wavy banners dies and embossed the winter wavy sayings using the embossing ink pad and white embossing powder, and attached to front of the tag.

Finally, I cut a piece of silver sparkle single cord for each tag, attached to back with tape, and covered with the extra white circle for a nice clean finish! 

Thanks so much for stopping by! I had so much fun creating these tags...I  hope you'll make some for yourself!

Tammy XO


Friday, November 22, 2019

Frosty Littles with Hello Bluebird

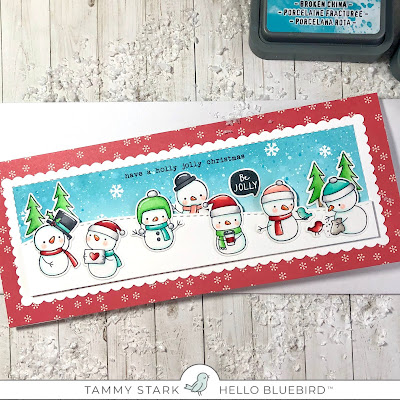
Hi friends! Today, I'm sharing a card I made using Hello Bluebird's Frosty Littles Stamp set, one of my all time favorites! I created a slimline card, so I could fit all the snowman cuties and not leave one out! Keep reading to see how I made this fun and festive card.


First, I began by cutting a piece of white cardstock using Trinity Stamps new  Slimline Card Series Dies. I used the smallest scallop panel to create a frame for my snowman scene. Next, I cut a piece of Bristol Smooth cardstock to fit inside the scalloped rectangle. Then, I inked the panel using Distress Oxides in Broken China and Tumbled Glass. Using a paintbrush, I flicked white acrylic paint and Broken China D.O. thinned out with water to give my background a snowy look.


Next, I stamped the darling snowmen from the Hello Bluebird Frosty Littles Stamp set onto  Bristol cardstock and colored with Copic markers.  Once done coloring, I die cut all my images using the Frosty Littles Die.  Now, it's time to assemble my framed snowman scene. To do this, attach the inked panel to the scalloped rectangle(I used foam tape for dimension, but it's not necessay). Next, using white cardstock cut your snow drift border using Trinity Stamps Scenic Border Die Set    and attach to front with tape runner or whatever adhesive you prefer.  Arrange the snowmen however you'd like and use foam squares to attach to card front.  I added the Be Jolly speech bubble and white embossed snowflakes from the Frosty Friends Stamp set to my scene. Lastly, I stamped the sentiment across the top in black ink from the Typed Christmas Stamp set.

Copic colors I used :)

To complete my card, I took a 7 X 8 1/2" piece of heavy white cardsock and scored at 3 1/2" on the 7" side to create my card base.  I cut a piece of red snowflake patterned paper from my stash to 3 1/2 X 8 1/2" and attached to card base Finally, I centered my scalloped rectangle onto card and attached with tape runner.      

Are you finished making your Christmas cards, or are you just scratching the surface like me? 

Thanks for stopping by today...Happy Crafting!

Tammy XO


Tuesday, November 19, 2019

Skating party - Hello Bluebird Stamps

Hi Friends! I'm so exciting to be sharing my first blog post with you guys!  I made a fun and bright card using Hello Bluebird Stamps , one of my most beloved stamp companies!
Today's card features Skating Party and  the amazing Warm Wishes Words Die.


To start, I took a 4 1/2 X 6" panel of Bristol smooth cardstock to create an A6 card. I ink blended the background using Wilted Violet and Picked Raspberry Distress Oxide inks.  Using a paintbrush, I flicked some watered down white acrylic paint to create a snowy look. I then stamped the snowflakes from the Skating Party stamp set with clear embossing ink.  Next, I used white embossing powder and heated to set.

I die cut the warm Wishes die twice, once from aqua cardstock, and then, from a thick glittered cardstock. Next, I layered them on top of each other, slightly offset so the aqua color pops and attached to top of card. Next, I die cut the snow  from white cardstock using the Hill and Dale Die.  I added a bit of chunky glitter along the edge for some sparkle.


I stamped the darling images onto Bristol smooth cardstock and then colored with Copic Markers, adding  details with a white gel pen. All images were then die cut using the Skating Party Die.  Then, I arranged my critters on the card front, backed with foam tape, and applied. I use foam tape on most images on every card, because I LOVE that dimension!!


Finally, I stamped the sweet sentiment in black ink right under the Warm Wishes Die. I attached my panel to a card base to complete  my card!

Thanks for stopping by to see how I created this bright and fun wintery scene. I can't wait to give this to one of my best coffee gals!

Tammy XO

All the Spooks - Halloween Specialty Kit with Hello Bluebird

Hello friends! I'm sharing a fun project using the now sold out Halloween card kit from Hello Bluebird. If you were able to snag this a...