Friday, January 29, 2021

Valentine Unicorns with Hello Bluebird


 Hi friends! I'd love for you to join me over on the Hello Bluebird blog today. I'm sharing all the details for this sweet Valentine themed card, featuring Unicorn Tales.

Thanks for stopping by!

Big hugs!

Monday, January 25, 2021

Valentine Theme Week with Pretty Pink Posh

 Hi there! I'm so excited to be kicking off Valentine Theme Week with Pretty Pink Posh! Today I'm sharing this fun slimline shaker card, mixing together some of the newest release with some previous ones - I just love how all the products work so well together!!

Save 15% off items in the Valentine section during our Valentine Theme Week!


To begin, I cut a piece of Bristol smooth cardstock using the largest die from the Slimline: Peekaboo Windows Dies, and ink blended it with Peacock Feathers and Tumbled Glass Distress Oxide Inks. I splattered some watered down Peacock Feathers onto my background for interest and set aside to dry.

Next, I did some paper piecing using the Valentine Hearts Stamp Set. First, I stamped the large scalloped hearts onto white cardstock and die cut them with the Valentine Hearts Coordinating Dies. I then stamped it again onto some patterned paper, fussy cut the hearts, and glued it to the die cut scalloped hearts. The other patterned hearts were simply die cut using the coordinating dies. 


I stamped the darling cupids from the Cupid Friends Stamp Set, colored with Copic markers, and die cut with the Coordinating Dies. Next, I stamped the word "Love", from the Valentine Hearts Stamp Set, onto white cardstock with Red ink, then I white heat embossed the sentiment from All My Love onto a black strip of cardstock.


Next, I created a white frame border using the Slimline Dies. I then cut a piece of acetate to fit the opening and attached to the backside of the frame. Lastly, I sprinkled some 4mm Sweetheart Sequins Mix onto my card base, then lined the rectangle with Double Sided Foam Sticky Strips, and attached to the front of my card, making sure it is tightly sealed to complete my card.

Thanks so much for stopping by! I hope you are inspired to start creating some Valentine's cards!

Big Hugs,
Tammy


Friday, January 22, 2021

Eggs To Dye For with Sunny Studio

 Hi friends! Today, I'm over on the Sunny Studio blog with a card featuring the newly released, Eggs To Dye For. 


To create my card, I first cut a piece of Bristol smooth cardstock using the Slimline Scalloped Frame Dies, and ink blended my background using Peacock Feathers and Speckled Egg Distress Oxide inks. Next, I cut a grassy border using the Slimline Nature Borders Dies and ink blended it with Fresh Pear and Grassy Knoll from the PinkFresh Studio Ink Cubes - Over the Hills. I cut a white rectangle and attached my inked background to it to create a little border before attaching to a light pink scalloped frame. 

Next, I stamped the eggs from Eggs To Dye For  and die cut with the Coordinating Dies


Next, I stamped and colored (with Copic markers) the sweet chicks from Chickie Baby and die cut with the Chickie Baby Dies. The stamped and colored images were then arranged onto my background and attached, using foam tape on some for dimension. Lastly, I stamped the sentiment from Eggs to Dye For with Memento Tuxedo Black Ink directly onto the background to complete my card.

Thanks so much for stopping by! I hope I've inspired you to get a jumpstart on your Easter and Spring cards!

Hugs,
Tammy


Saturday, January 16, 2021

Valentine Circles with Pretty Pink Posh

 Hi friends! Today, I'm sharing a sweet Valentine's themed card, featuring new products from the brand new release at Pretty Pink Posh!


To begin, I die cut Bristol smooth cardstock using the new Slimline: Peekaboo Window Die Set. Next, using the new Lattice Stencil, I created a fun background by blending Festive Berries, Picked Raspberry, Worn Lipstick, and Spun Sugar Distress Oxide inks. Next, I splattered some pink and black acrylic paint onto my background for interest. 

I stamped, colored with Copic markers, and die cut the following sets:


Next, I die cut a white scalloped circle using the Scallop Circles Dies and layered over an ink blended circle and attached to the center of the inked background. I then attached the colored Valentine Circles to a white scalloped circle cut using the Valentine Circles Coordinating Dies. Lastly, I cut a strip of black cardstock using the Simple Strips Dies and white heat embossed the sentiment from the All My Love Stamp Set, added a couple of little red hearts die cut from the Valentine Vines Die, and attached to a white card base to complete my card!

Thanks so much for stopping by today! See you next time!!

Hugs,
Tammy

Friday, January 15, 2021

1 Stamp, 3 Ways - Special Delivery

 Happy Friday, friends! Today, I'm over on the Lawn Fawn blog with another 1 Stamp, 3 Ways feature! This month, we are showcasing the sweet (or TWEET) new set, Special Delivery. Join us over on the blog for all the details and a complete product list.


Since so many of you reach out to ask about Copic colors used, I will be adding a color chart every month!


Thanks so much for stopping by! As always, I love hearing your suggestions for sets you would like to see featured in upcoming 1 Stamp, 3 Ways! Please leave your suggestions here or over on the Lawn Fawn blog.

Have a wonderful weekend!

Big hugs,

Tammy

Tuesday, January 12, 2021

Pretty Pink Posh Birthday Celebration Blog Hop


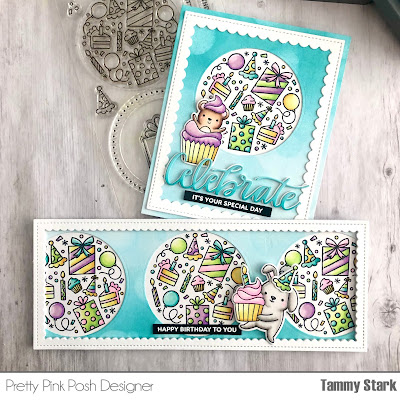
Hi friends! We're helping Pretty Pink Posh  celebrate their 7th Birthday and new release with a Birthday Celebration Blog Hop and an amazing giveaway!


My first card features the new Let's Party Stamp Set and Let's Party Coordinating Dies, Cupcake Critters Stamp Set and Coordinating Dies, Layered Bokeh Stencils, and the Celebrate Script Die (free gift with a $100 purchase). To begin, I colored the images with Copic markers and die cut with the coordinating dies. The background was created by blending Peacock Feathers and Tumbled Glass ink onto white cardstock using the Layered Bokeh Stencils.  


Next, I cut a circle using the Let's Party Dies and layered the background over the colored image before attaching to a card base. I added a white frame using the Scallop Frames Dies, then attached the die cut Celebrate script to my card. Lastly, I added a sentiment from the Let's Party set by white heat embossing on black cardstock Simple Strip to complete my card.


My second card uses the same stamp sets as above, along with the fantastic, new Slimline: Peekaboo Windows Dies and Slimline: Scallop Frames Dies. The background was created by blending inks, just as my first card, onto a white rectangle die cut using largest rectangle from the Slimline: Peekaboo Windows Dies the Layered Bokeh Stencils. Next, I cut three circles using the Let's Party Coordinating Dies and placed my background over the colored images from Let's Party before attaching to a card base. I then cut the Slimline Scallop Frame three times from white cardstock and layered it on top. I added the colored image from Cupcake Critters and a sentiment from the Let's Party set by white heat embossing on black cardstock Simple Strip to complete my card.

GIVEAWAY:

Pretty Pink Posh will be giving away 6 $25 gift certificates during the three day blog hop celebration! Comments must be left by 11:50PM, January 15, 2021. The winners will be announced on the Pretty Pink Posh blog.


Here's a list of all the designer's participating in today's blog hop:


Thanks so much for stopping by today...happy hopping!!

Hugs,
Tammy


All the Spooks - Halloween Specialty Kit with Hello Bluebird

Hello friends! I'm sharing a fun project using the now sold out Halloween card kit from Hello Bluebird. If you were able to snag this a...